|
This Months Meeting 7.30pm,
Tuesday 17th October. Regionals
Post-Mortem |
|
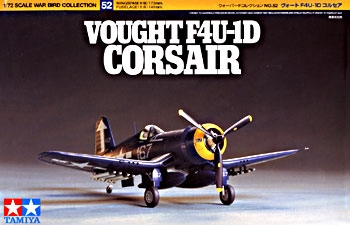
Tamiya 1/72
F4U-1D Corsair
I have been chomping at the bit waiting for this kit, since Tamiya first announced it 3 months ago, hoping for the definitive 1/72 Corsair. I’ve always wanted to build the aircraft of Major Archie Donahue, who was the first carrier based USMC ace-in-a-day, shooting down two Vals and three Zekes while serving with VMF-451 "Blue Devils" (this squadron later became VMFA-451 "Warlords") aboard U.S.S. Bunker Hill. Inside the box are two sprues of dark grey plastic, one of clear and two rubber grommets. Parts breakdown is identical to the 1/48 kit, except for the wings, which do not include wingfold or lowered flaps options. Two immediate gripes (might as well get the bad out of the way first), both of which can be fixed with aftermarket, or careful scratch building; only the inboard starboard flap is a separate piece, so surgery will be required to drop the flaps (as was often the case with a Corsair on the ground); second, the exhaust stubs are moulded as ovals in a shallow depression with no depth at all. These will need grinding out and replacing with Moskit or plastic tubing exhausts. The inboard flap has moulded, incorrectly, the pilot's step, which needs to be filled for the F4U-1D, but that is not a major job either. Gripes out of the way, now for the good news – this kit is a gem. Cockpit detail is easily on a par with the True Details resin set for the Hasegawa kit. Seatbelts are provided as a decal though, so etched pieces won’t be a problem. 8 pieces make up the cockpit, with another 2 pieces making up the top fuselage and headrest such that it would seem the Birdcage Corsair is imminent. Wheel well detail is very nice, only missing some wiring to make it convincing (I've already shoehorned the Aires wheel wells into mine - told you I was chomping at the bit). Choice of either open or closed cowl flaps, with exhaust collector pipes represented nicely by a separate piece, which mounts between the cowl and cowl flap pieces. Two canopies are provided for early (F4U-1A) and late (F4U-1D) style hoods. A full depth tail wheel bay and cockpit, with optional clear piece for the pilot's window, or grey styrene insert for later aircraft, make for a convincing interior. Wing radiator inserts are very well done. The P&W R-2800 radial engine is in 3 parts (two rows of cylinders and the front of the gearbox/drive housing), and the cylinders have depressions moulded for the ignition leads. A small amount of detail will generate a fantastic looking replica behind the cowl. 3 decal options - two of which are the same as that offered in the original Hasegawa boxing – aircraft number 530 of VMF-312 with chequered cowl and rudder, aircraft number 167 of VF-84, U.S.S. Bunker Hill which is the box-top model with the yellow cowl and large white arrows, and aircraft number 1 of VMF-112, U.S.S. Bennington. Ordnance includes 8 HVARs and two wing-mounted drop tanks, with an option for the end caps on the pylons if the tanks aren't fitted. I have added the centreline drop tank from the Academy kit instead (no centreline tank is included) and the rest of the weapons have gone into the spares box. Holes need to be opened for any ordnance you chose to use. Overall (and I have compared this to both the Academy and Hasegawa kits) there is absolutely no competition. Buy Tamiya. Hasegawa and Academy kits are still nice kits (and cheaper) of this bent-wing bird, but not to the same standard of detail as Tamiya’s offering. While slightly more expensive, the level of detail and fit is top notch. Shape & size accuracy, I can't comment on as my references on this aircraft are scarce, but assembled (alright, taped together, though the wings are finished) it looks and sits like a Corsair. At 1300 yen, this is slightly more than the Skyray or Thunderjet, but still fantastic value for money. And I will be building at least 1 more (probably to use my Aeromaster RNZAF markings on). |
|
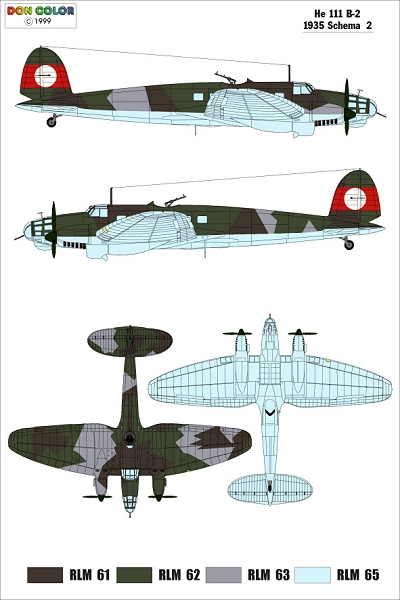
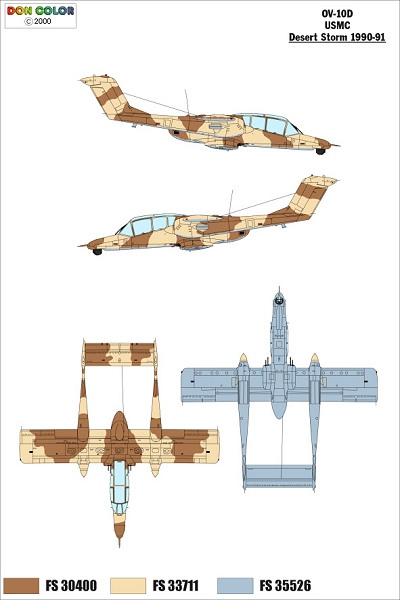
Useful Internet Sites For The Month While browsing for some paint scheme information, I came across a site by the name of "Don Color", which is very useful for information regarding colour schemes for various military aircraft (and some ground vehicles/equipment), showing paint colour samples and excellent 4 view drawings of camouflage patterns. Many aircraft are covered, from early Japanese, RAF, US and Luftwaffe through to modern US, Saudi, Royal Navy/Air Force, Israeli and Luftwaffe. Two samples are printed below the URL. For those of you receiving the printed newsletter, these images are all in colour. http://www.jpsmodell.de/dc/emain.htm
|
|
For those of you with an ALPS printer, and/or wanting correct style RAF/RCAF/RNZAF fonts for WWII to modern aircraft, try: http://members.aol.com/p5219/fonts.htmFonts available for free download are:
RAF RCN RAF WWII Style 1 RAF WWII Style 2 RAF WWII Style 3 RAF WWII 45° Clipped Style 1 RAF WWII 45° Clipped Style 2 |
|
TLAI ENTERPRISES The Amarillo font (USAF) is shareware, but the Long Beach (USN/MC) font is a demo only and needs to be registered to unlock the vowels and digits 1 and 0 (these are the same as the I and o). |
|
IPMS Auckland Regionals Another successful Regionals under our belt, and a reasonably good (though somewhat poorer than expected) turnout. The committee would like to thank all those members who put time in over the weekend to set-up, clean-up, provide models for display, man the door, or be on hand to answer public queries and questions. Special thanks must go to Shin-Keum Kang of Ace Hobby/Kang’s Hobby for the sponsorship of the show and the two first prizes. We would also like to extend thanks to the following for their sponsorship and/or support of the contest:
The class winners were: |
|
Category |
Class |
Place |
Modeller |
Subject |
|
Aircraft |
1:72 - Propellor Single Engine |
1 |
Bill Bourke |
P-40 'Gloria' |
|
2 |
Mark Davies |
Dewoitine 520 |
||
|
3 |
Craig Sargent |
Macchi MC 202 |
||
|
1:72 - Propellor Multi Engine |
1 |
Mark Davies |
Kawanishi H6K5 Type 97 (Mavis) |
|
|
2 |
Mark Davies |
Potez 540 |
||
|
3 |
Martin Short |
Dornier Do335 A-1 |
||
|
1:72 – Jet |
1 |
Craig Sargent |
Me 163B-0 Komet - Wolfgang Spate |
|
|
2 |
Martin Short |
Arado E555 |
||
|
3 |
Mark Davies |
Lockheed SR-71 Blackbird |
||
|
1:72 – Helicoptor |
1 |
Mark Davies |
UH-34 Sea Horse |
|
|
1:48 – Propellor |
1 |
Doug Parrington |
RNZAF F4U-1D |
|
|
2 |
Doug Parrington |
RNZAF TBF-1C |
||
|
3 |
Greg Jaques |
Hawker Typhoon |
||
|
1:48 – Jet |
1 |
Craig Sargent |
F/A-18A Hornet |
|
|
2 |
Barry Burton |
Messerschmitt Me 262B |
||
|
3 |
Colin Whitehouse |
De Havilland Sea Vixen |
||
|
1:32 |
1 |
Budi Walker |
Fieseler Storch |
|
|
Diorama |
1 |
Colin Whitehouse |
RN Phantom Deck Scene |
|
|
Military Vehicles |
Armour |
1 |
Steve Evans |
Marder II |
|
2 |
Lance Whitford |
ISU-152 |
||
|
3 |
Lance Whitford |
T-60 Early Production Version |
||
|
Artillery |
1 |
Lance Whitford |
Pupchen - Ski Version |
|
|
2 |
Lance Whitford |
Pupchen - Wheeled Version |
||
|
Diorama |
1 |
Steve Evans |
"Breakdown" |
|
|
2 |
Steve Evans & Paul Buckland |
"Halt! The Shot" French Town Square |
||
|
3 |
Andrew Sage |
M8 Diorama |
||
|
Figures |
Busts |
1 |
P Nicholas |
Gross Deutschland Grenadier |
|
Dismounted |
1 |
Sean Talbot |
WW I Trench raider |
|
|
2 |
Sean Talbot |
German PanzerJager |
||
|
3 |
Kevin Benson |
"Most wanted" |
||
|
Civilian Vehicles |
Cars |
1 |
Paul Young |
Peugeot 206 |
|
2 |
Leonard Young |
Ford Focus WRC |
||
|
3 |
Michael Kao |
Lexus IS 200 |
||
|
Motorcycles |
1 |
Rendy Sugiarto |
Yamaha YZF-R1 |
|
|
2 |
Rendy Sugiarto |
Yamaha YZF-R1 |
||
|
3 |
Rendy Sugiarto |
CBR 1100XX |
||
|
Ships |
1 |
Bob Beaver |
USS New Jersey 1946-1948 |
|
|
2 |
Pete Randall |
Royal Navy O-Class Destroyer |
||
|
3 |
Pete Randall |
USS Princeton CVL-23 |
||
|
Space and Sci-Fi |
Real Space Craft and Missiles |
1 |
Colin Whitehouse |
Fieseler V-1 Flying Bomb |
|
Fictional |
1 |
Budi Walker |
Ultra Marine Landspeeder |
|
|
1 |
Raymond Yang |
Terminator 2 |
||
|
2 |
Tod Trotman |
Predator 2 |
||
|
2 |
Budi Walker |
Eldar Phoenix Lord |
||
|
3 |
Raymond Yang |
Street Fighter "Akuma" |
||
|
3 |
Alexander Berdebes |
Space Wolf Grey Hunters |
| The two prizes of the trip to Korea went to: |
|
Best Armour of Show |
Steve Evans |
Marder II |
|
Best Aircraft of Show |
Craig Sargent |
F/A-18A Hornet |
|
|
|
Notes From The
Head Judge BACK TO BASICS guys! Too many of you have concentrated on the finish of the models and forgotten the basics of seam filling and alignment of parts. Aircraft: Many of the aircraft had glaring gaps and misaligned wings and tail planes (watch for droop, or anhedral on one tailplane and dihedral on the other!). One beautifully weathered a/c was spoilt by having a visible seam showing down the centre of the cowling. Remember, weathering will sometimes accentuate faults such as this! AFVs: if you add stowage, think about how it is attached – very rarely would anything be left just sitting on the rear decking. The same holds for added camo nets, extra armour (spare track links etc.), these were usually secured by wire or straps. Internal radio gear and external lights should have wiring added. If you are adding figures, clothing has a MATT finish (unless leather or lycra!) – too many were spoilt by having a semi-gloss finish. Cars and motorcycles: Some nice paint jobs spoilt by evident ‘Orange Peel’ and dust in the finish – I know gloss paint is one of the best dust attractors in the world, but it sticks out like the proverbial ‘Dogs…’. If you are entering a model in competition, and it’s not on a base, make sure everything is secure – it’s not too good when a wheel falls off when the judge examines it! Make sure all wheels touch the ground – some of the entries would have been fun to drive if they had been a real car!! Painted interiors are also a must – unless in a slammer (kerbside?) class – bare black plastic doesn’t cut the mustard. One further point to look at is disk brakes – have a look next time you have a wheel off your car – most are cast iron and rust covered. The only shiny part is a ring where the pads actually touch on the disc. This doesn’t apply to most road motorcycles as the discs are usually of a stainless steel alloy but there is usually some discolouration where the pads touch. Race bike discs are either cast iron or carbon. On a final note, I would like to thank Craig, Keith and Kevin for their assistance with the judging. |
|
Hints And Tips From The Net Non-Skid Surfaces I use 3M adhesive spray, available in any hobby or craft store and spray a VERY LIGHT coat on the area to be covered. While it is still wet or tacky, sprinkle the area with talcum powder. Blow off the excess. Apply a second VERY LIGHT coat of adhesive and talcum powder. IMMEDIATELY remove the tape. If you wait too long, the adhesive will tear leaving a rough edge. It is best to go over the margin with a sharp #11 blade to make sure you have a clean edge. When it is dry (24 hours) paint it the intended color. Sprucing Up Cockpits All aircraft from the 30's on had seatbelts and, depending on the aircraft, shoulder straps. There are numerous makers of seat and shoulder harness buckle PE. Waldron, Reheat, Eduard and others produce very good products. I prefer not to use PE belts as they are hard to bend and do not look realistic. For the belts themselves I use thermal fax paper. Thermal receipt paper is great, only about 0.003" thick but tough. Cut it with a fresh #11 blade and a steel straight edge. Side consoles, especially in more modern aircraft, are great places to add detail. Throttle, prop and mixture levers, radio and other console buttons, switches, O2 hoses and masks, book and chart boxes are but a few examples. Gusights and HUDs are also a great source of extra detailing. They are very visible on most aircraft and a little attention here goes a long way. Discard kit gunsight glass. It is way to thick in most cases. I use Evergreen 0.005" cleat sheet cut with a small pair of very sharp scissors. Glue in place with white glue or watch crystal glue. Optics are also a great way to add detail. Go to the section on optics for more detail. Modern day ejection seats are a great place to do some detail work. Connecting rods, O2 and "g-suit" hoses, life raft and seat pan release handles, ejection handles can all be made from wire, styrene or solder (my personal favorite). One nearly universally overlooked area is Remove Before Flight flags. On the ground ALL ejection seats are disarmed and pinned. Attached to the pins are RBF flags. These flags are a great way to add realism to any cockpit. Canopy and stores jettison and other "keepa you stinkin' hands off" areas are also pinned and flagged. Go to the section on Remove Before Flight flags to see how I do them. Wingtip Navigation Lights For faired wing tip nav lights I start by using the Dremel and a cutting wheel to carefully cut away the area. I cut and fit a piece of the clear sprue into the opening, making sure to leave plenty of excess. With the Dremel and cutting wheel I roughly shape the clear piece to the surrounding contours. I next take a file and file the clear part to its final shape. Using Testor's hobby sanding films I sand the piece until it matches the final contours perfectly and is as smooth as I can get it. I then polish it back to its original smoothness with the Dremel, polishing wheel and polishing compound. Cover the clear piece with something like Ambroid EZ mask until after final finishing is complete. Now use the clear colors. You will be amazed at the difference it makes over just painting the area silver and covering with clear colors. Remove Before Flight Flags Verlinden makes a sheet of flags for 1/48 and 1/32 scale. They are very good but like all Verlinden products, are expensive. I scanned the sheet using 1200 dpi to ensure high quality and printed it on coated HP paper using a photo quality HP printer. For special types of flags (ejection seats) and larger scales I had to make them myself using MS PowerPoint. I made a text box with a red background and added white lettering in an Arial font. A little trial and error is necessary to get the size just right. Use normal or economy settings otherwise the red will bleed into the white and make the letters unreadable. Concrete Tarmacs And Runways The first step is to use a fine orange juice strainer or mesh screen to screen out all but the finest particles. If the particles are too large, the scale effect will be lost. Also, if you are using a wood base, screw it into a piece of 3/4" plywood (from behind of course) with dry wall screws to prevent warpage. Your base is going to get a little wet! You will leave it attached to this piece of plywood until the wood and concrete are completely dry and cured. If you plan to stain and polyurethane your base, mask off the area to be covered with concrete. It will not adhere to a smooth surface. I roughen up the wood with coarse sandpaper (60 grit) and coat it with a liberal amount of carpenters glue. Using the OJ strainer again, I lightly sprinkle the sifted concrete onto the base using just enough to completely cover. Don't worry if the glue does not wet all the concrete. I then spray fresh water onto the concrete in a fine mist using a household cleaner spray bottle. Wet the concrete thoroughly, there should be a little standing water! Sprinkle another coat of concrete on top until it is thoroughly covered. Immediately remove the masking tape so you have a clean line. Set the base aside in a low humidity environment for 48 hours. I apply black acrylic paint through a syringe and hypodermic needle to simulate the tar strips. I do not use a straight edge like some recommend, preferring to free hand it along a penciled line. It is too easy to smear it if you use a ruler. For 1/48 and larger I use a had drill and drill bits to drill out the pad eyeholes. I use solder to make the tie down rings, gluing them in place (after the yellow is painted) with CA. Touching Up And Polishing Canopies If the scratch is deep, you will need to use sandpaper to smooth it out. It is scary the first time you use it because you will swear you have ruined the piece. I use Testor's hobby films and start with medium (NOT coarse) and work my way down to ultra fine. I finish it off with 0000 steel wool. There are several canopy polishing compounds available but I prefer to use Turtle Wax's clear coat polish for cars. It is less abrasive and a single container will last about 100 years. I get the polishing wheel very wet, turn on the Dremel and cover the wheel with polish. Work the polish into the plastic in a circular pattern with VERY LIGHT pressure. Keep the wheel wet, it provides lubrication that will prevent you from burning the plastic. Use a soft cloth or Q-tip to gently remove the polish powder after it dries. If you are just looking for a way to shine up a canopy use a wetted Q-tip covered with the polish and do it manually. I shy away from ever using Future™ on canopies (unless I tint them with the Detailer). Notice how floor wax yellows with age? So will your canopies and stripping a floor is a lot easier than a canopy!!! Home-Made Decals In order to use an ink jet printer to print decals, you must first prep the surface so it will take the ink without beading. I use Model Master clear flat lacquer and an airbrush. Use high pressure and keep the tip far enough away from the film so that the lacquer is drying as it is hitting the surface, the goal is to have a rough surface for the ink to grab. I use a variety of programs to make decals but use PowerPoint the most. I scan graphics and import them in as well. For stenciling, I use an Arial font and a font size of 2 to 8 depending on the scale and application. For best results is best to have a printer capable of producing photo quality. Other printers will do but the quality will not be as good. I always print on "best" quality. be careful handling the sheet until the ink dries or it will smudge. If you mess up, go over it quickly with a damp rag. The inks are water-soluble and will come off as soon as they hit water so you must now make them permanent. I spray Model Master Glosscote or clear gloss lacquer over them, two coats is usually sufficient. I let them dry overnight and apply them the next day as I would any other commercially made decal. Optics As I had mentioned in the wing tip nav lights NEVER throw away clear sprue!!! To make gunsight or camera optics, I place a small piece of sprue into the adjustable chuck on my AC Dremel and turn it into a lathe. I use a file to reduce the sprue to the right diameter and then use the file to round off the end. I then use the sanding films to get it smooth and ready for polishing. I usually cut off the "lens" prior to polishing. I use an X-acto saw blade in a #11 handle. This part is tedious, take your time so you do not have to repeat the above process! Been there, done that. Be careful, research has shown they can travel for miles if you pop them! I take the cut end and rub it against the films to smooth out the saw blade marks and get it ready for polishing. I stick the piece of plastic on a piece of masking tape and polish with the battery powered Dremel and clear coat polish. Turn it over and polish the flat end. Depending on the effect you want, you may or may not want to paint the flat part silver, I usually don't Modern day optics have optical coatings to reduce reflection and glare. To simulate this I use dilute green or purple (you have to mix red and blue) "The Detailer" and paint in on with a brush. This is best accomplished while it is still stuck on the masking tape. Let it dry for a good hour at least. I glue it in place with Testor's clear plastic cement. Note: This was from a US based site, so some products mentioned may not be readily available here. And so the ship modellers are not forgotten, a link for them which if they haven’t seen it yet, will be worth a visit: http://www.shipcamouflage.com/index.htm |
|
For more information contact
us |
| The information
displayed in these pages belongs to IPMS New Zealand Auckland Branch and may be copied for personal use only. |